Data representation has been a crucial factor in social networking website. As we know that there are various methods to represent data on the website, but what matters is ease of use for display the data. Traditionally, we present data in tabular format which is a complex and time consuming for end users.
We faced the same challenge for one of our clients Langmart. They wanted an efficient way to represent and manipulate the tabular data for their end users. They also wanted real time results from the server side for accuracy. We looked at solutions like jQuery DataTables and jQuery jqGrid which are very good solutions for tabular data. Since jquery jqGrid supported server communication with the ease, we recommend our client to use jqGrid for their social networking website. In this article we shall demonstrate the usage jqGrid on socialengine for tabular data.
jqGrid Introduction
jqGrid is an Ajax enabled JavaScript control that provides solutions for representing and manipulating tabular data on the web. jqGrid plugins will help us to show data in table format with lot of advanced features like sorting, searching or filtering without writing any code. jqGrid is a group of development techniques used to create web applications which can modified the web application layout without refreshing the page.
When the user send a javascript request by the browser, the jqGrid allow the user’s to interact with the server and receives back a response from server without refreshing or loading the browser. Means, the server handles the actual changes to the database, and not the user’s browser.
The main components which required to integrated jqGrid in the web application are:
- jquery.jqGrid.min.js – contains the jqGrid JavaScript library in the minimized form
- jquery.jqGrid.src.js – contains the jqGrid JavaScript library in the source form
- ui.jqgrid.css – The CSS used by the jqGrid
Grids Layers
A jqGrid is comprised of the following four parts, which will help you to presents tabular data for easy manipulation in a web browser.
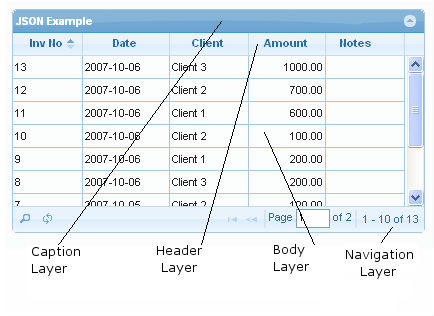
Caption layer contains common information for the represented data.
Header layer contains information about the columns: labels, width, etc.
Body layer is the data requested from the server and displayed according to the settings in the column model.
Navigation layer contains additional information from the requested data and actions for requesting little pieces of information like paging, editing, deleting, adding to and searching your grid data.
Creating First jqGrid
Understanding how jqGrid works will help you get up to speed with the full capabilities of the plugin we’re going to create a grid with information. You need the following three things in order to use jqGrid:
- jqGrid database
- jqGrid HTML page to show the data
- jqGrid server-side component to act as an interface between your web page and the database.
1. jqGrid DataBase
We’ll need a table to work with jqGrid. Please create yours table as you would normally do. you can look at the database to create a mysql table
CREATE TABLE table_name (
       // table elements
);
2. jqGrid HTML page to show the data
The second step was to create the main page that will use the JavaScript file. It is about the view(html file). Here user send a javascript request by the browser to interact with the server.
CSS Files
For writing a simple grid, You have to add these css files to your directory.
Javascript Files
For writing a simple grid, You have to add these javascript files to your directory.
 $("#list").jqGrid({
	url: 'URL',
	datatype: "json",
        colNames: [ "INVID_NO", "DATE","CLIENT", "AMOUNT", "NOTES"],
        colModel: [
		  { name: "invid_id",index:'invid_id', width: 50,},
		  { name: "date", index:'date',width: 80},
		  { name: "client", index:'client',width: 80},
		  { name: "amount",index:'amount', width: 80},
		  { name: "notes",index:'notes_id', width: 80,},
        ],
           pager: "#pager",
	   rowNum: 10,
	   height: "auto",
	   rowList: [10, 20, 30],
	   sortname: "invid_id",
	   sortorder: "desc",
	   emptyrecords: "No records to view",
	   pgtext : "Page {0} of {1}",
           ecordtext: "View {0} - {1} of {2}",
	   viewrecords: true,
	   gridview: false,
	   autoencode: false,
     }).navGrid('#pager1',{edit:false,add:false,del:false});
3. jqGrid server-side call
Now, it is time to go to the Controller class to implement the actions invoked from the view. The main method invoked from the JavaScript code by using AJAX to load the data that will be used by the jqGrid by using the grid settings is the next one.
public function testAction() {

    // get the param if any
    $param = $this--->_getParam('name_of_the_parameter');

    // Get the requested page. By default grid sets this to 1.
    $page = $_GET['page'];

    // get how many rows we want to have into the grid - rowNum parameter in the grid
    $limit = $_GET['rows'];

    // get index row - i.e. user click to sort. At first time sortname parameter -
    $sidx = $_GET['sidx'];

    // sorting order - at first time sortorder
    $sord = $_GET['sord'];

    // if we not pass at first time index use the first column for the index or what you want
    if(!$sidx) $sidx =1;

    // calculate the number of rows for the query. We need this for paging the result
    $tableName = Engine_Api::_()->getDbTable('xyz','xyz');
    $select = $tableName->select()
              ->setIntegrityCheck(false)
              ->from(array('abc' => $tableName->info('name')),array('column name'));

    $this->view->paginator = $paginator = Zend_Paginator::factory($select);
    $count = $paginator->getTotalItemCount();

    // calculate the total pages for the query
    if( $count > 0 && $limit > 0) {
           $total_pages = ceil($count/$limit);
    } else {
           $total_pages = 0;
    }

    // iterate the data
    foreach ($paginator as $item) {
           $response['rows'][$row_counter]['invid']=$item['invid'];
           $response['rows'][$row_counter]['invdate']=$item['invdate'];
           $response['rows'][$row_counter]['title']=$item['title'];
           $response['rows'][$row_counter]['amount']=$item['amount'];
           $response['rows'][$row_counter]['notes']=$item['notes'];
           $row_counter++;
    }
    $this->_helper>json($response);
}
Conclusion
This blog is going to tell you the advantage of using jqGrid over the traditional tables to present data in tabular format. jQgrid is an ajax enabled JavaScript control that provides solutions for representing and manipulating tabular data on the website. It is highly customizable, and also it has a user friendly interface powered by AJAX to fetch data dynamically from the server. To learn more you can read from the jqGrid Guides.